Honda Pilot Lug Nut Torque Specs: Every Generation (2003–2026)
Whether you’re rotating your tires at home, swapping to winter wheels, or detailing your wheels, applying the correct lug nut torque to your Honda Pilot is something you shouldn’t take lightly.
Too loose and a wheel can separate from the vehicle. Too tight and you risk warped brake rotors, stretched wheel studs, or lug nuts that are nearly impossible to remove later.
This guide covers verified torque specifications for every Honda Pilot generation from 2003 to 2026, along with socket sizes, thread specs, a step-by-step tightening procedure, and answers to the most common questions from Pilot owners.
If you’re in a hurry: The recommended lug nut torque for the 2003–2008 Honda Pilot is 80 lb-ft (108 Nm). For all 2009–2026 models (2nd, 3rd, and 4th Gen), the correct torque is 94 lb-ft (127 Nm). The socket size changed from 19mm on first-gen models to 22mm on all later generations.
What Is Lug Nut Torque and Why Does It Matter?
If you’re unfamiliar with the world of mechanics, the term “lug nut” might sound a little strange. But it’s actually just a simple measurement.
Lug nut torque is basically the amount of twisting force you’re applying to clamp your wheel against the hub. The unit — pound-feet (lb-ft) or Newton-meters (Nm) — doesn’t matter much, they’re just two ways of saying the same thing.
Basically, your lug nuts need to be tightened correctly so they’re secured “properly.”
Why is this important? Because tightening your Honda Pilot’s lug nuts isn’t just about making them “tight.”
- Too loose: The lug nuts slowly back off from vibration while you drive. You might notice a wobble at speed, or hear a rhythmic clunking. Worst case? The wheel separates from the car entirely — and your Pilot goes rolling down the highway like one of those grainy Russian dashcam videos. You know exactly the ones. Not a situation you want to star in.
- Too tight: You stretch the wheel studs past their limit, which distorts the brake rotor. That distortion shows up as a pulsating feeling through the brake pedal when you stop. It can also crack the hub flange, and it almost always means you’ll be fighting with a breaker bar the next time you need to remove the wheel.
- Unevenly torqued: Even if every nut is technically “tight enough,” if some are tighter than others, you’re pulling the rotor hat slightly out of round. This is actually one of the most common causes of brake shudder — and it gets misdiagnosed as warped rotors all the time.
I once had an experience where a tire shop mechanic tightened the lug nuts too tightly.
After a neighborhood garage replaced my brake pads, the mechanic tightened the lug nuts with an impact wrench and no torque stick — no spec chart consulted. Months later, when I wanted to remove the wheel for detailing, I could barely break the nuts loose with a breaker bar. The hub face also showed slight deformation marks from the overtightened seat. It’s an easy mistake to make, and an easy one to avoid.
So, you’ll want to make sure that the wheel bolts are tightened to the correct torque level so you don’t end up like me.
The good news: all you need is a torque wrench (a basic $25 one works fine) and about five extra minutes. That’s the whole fix.
Honda Pilot Lug Nut Torque Chart (All Years)
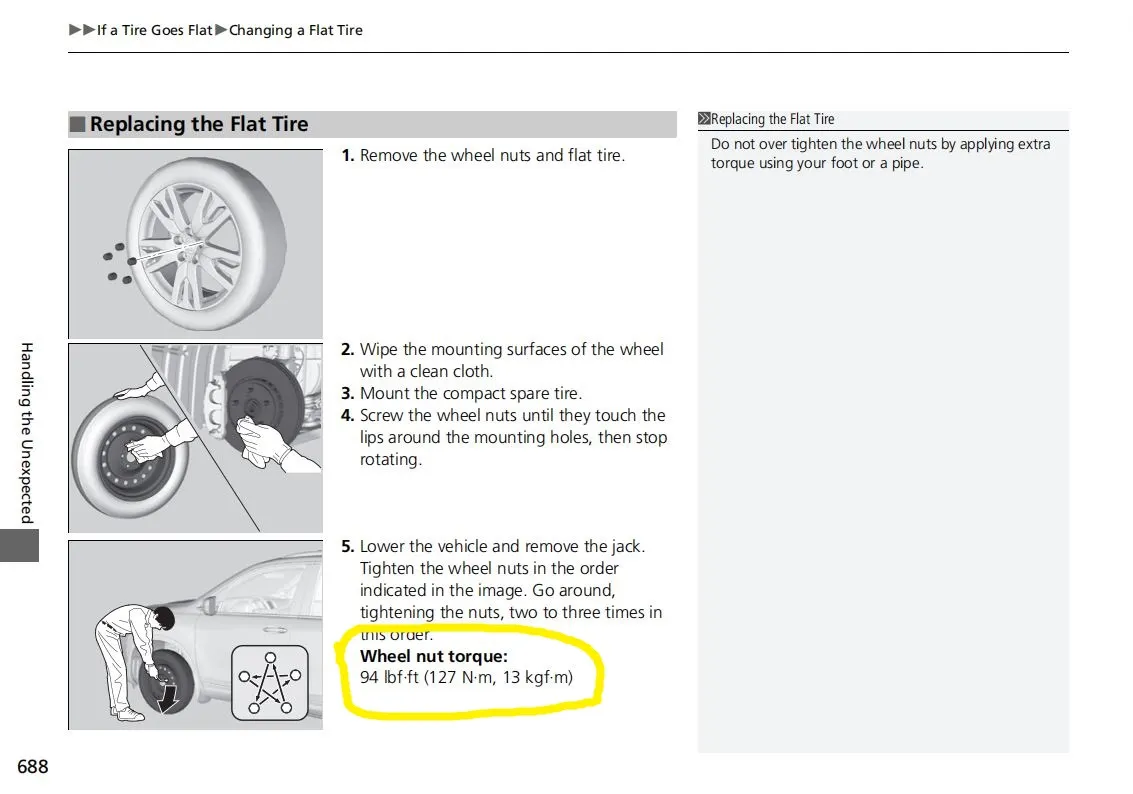
Here’s every generation laid out cleanly. These figures come directly from Honda’s owner’s manuals and factory service documentation.
| Model Year | Torque | Socket Size |
| 2023 – 2026 | 94 lb-ft (127 Nm) | 22mm |
| 2016 – 2022 | 94 lb-ft (127 Nm) | 22mm |
| 2009 – 2015 | 94 lb-ft (127 Nm) | 22mm |
| 2003 – 2008 | 80 lb-ft (108 Nm) | 19mm |
One thing worth flagging about the 2016 model year: the 3rd-gen Pilot jumped up to larger M14 × 1.5 wheel studs (compared to M12 × 1.5 on everything before it).
The torque number stays the same at 94 lb-ft, but the hardware itself is different — meaning you can’t mix and match lug nuts between pre-2016 and post-2016 Pilots. More on that in the specs section below.
Specs You Need If You’re Buying Aftermarket Wheels
Beyond the torque, you need these specs if you are buying aftermarket wheels or replacement nuts:
Bolt Pattern
- 2009 – 2026 (2nd Gen onward): 5 × 120mm
- 2003 – 2008 (1st Gen): 5 × 114.3mm
Thread Pitch (stud size)
- 2016 – 2026: M14 × 1.5
- 2003 – 2015: M12 × 1.5
Lug Nut Seat Type
- Factory Honda wheels use a Ball Seat (rounded/radius seat)
- Most aftermarket wheels use a Conical / Cone Seat (tapered at 60°)
Hub Center Bore
- All generations: 64.1mm
Don’t mix up seat types. Using a conical-seat lug nut on a ball-seat wheel — or the other way around — means the nut only contacts the wheel on a tiny ring of metal instead of seating properly. It might feel tight, but it can back off under vibration. Always match your lug nut seat type to the wheel you’re mounting.
How to Properly Torque Your Honda Pilot Wheels
You can tighten the lug nuts on your Honda Pilot with a simple tool. All you need is a torque wrench—it doesn’t have to be an expensive one; a basic one will do, and they usually cost around $20.
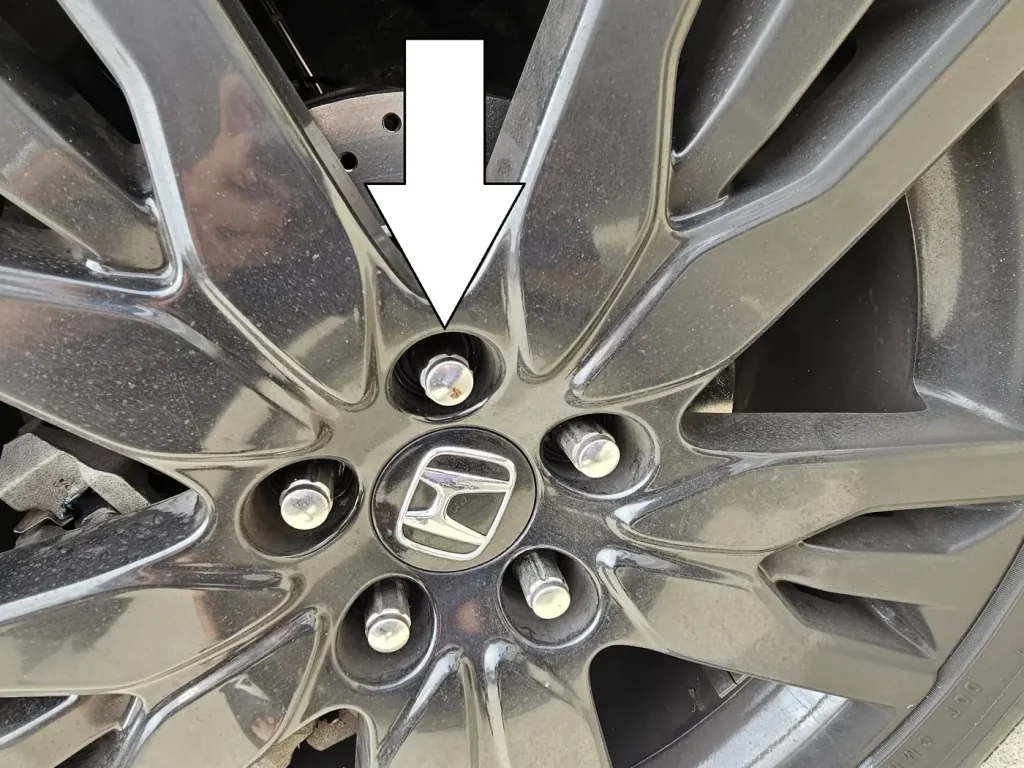
One more thing—specifically for the Honda Pilot, the lug nut pockets in the wheel are recessed (See the image above), which means a regular thick-wall socket might scrape the alloy finish when you’re working. Pick up a thin-wall deep socket in the right size, and you’ll avoid that headache entirely.
What You’ll Need
- Torque wrench (1/2″ drive, rated to at least 100 lb-ft)
- Thin-wall deep socket: 22mm for 2009–2026, 19mm for 2003–2008
Step-by-Step
To ensure safety and longevity, follow the Star Pattern (Cross-pattern) sequence.
- Hand tightens: Always start the lug nuts by hand to avoid cross-threading.
- Snug Phase: Use a lug wrench to snug the nuts in a star pattern while the tire is slightly touching the ground. I used a 22mm thin-wall deep socket on my 2021 Honda Pilot Elite to avoid scratching the alloy wheels.
- Final Torque: Lower the vehicle fully and use a calibrated torque wrench to hit 94 lb-ft.
What’s the Star Pattern, Exactly?
Number your five lug positions 1 through 5 starting at the top, going clockwise. Then tighten in this order: 1 – 3 – 5 – 2 – 4. You’re skipping one stud each time, which spreads the clamping force evenly around the whole wheel rather than pulling one edge down before the other.
Mistakes That Are Way Too Easy to Make
- Trusting the ugga dugga gun alone. You know the sound — ugga dugga ugga dugga — zero torque control. Always finish with a calibrated torque wrench. Many shops skip this.
- Putting grease or anti-seize on the threads. Honda specs dry torque. Lubricant throws off the friction, so your wrench clicks at 94 lb-ft while the actual clamping force is way higher. You’ve overtightened it without knowing.
- Tightening in a circle. Going 1–2–3–4–5 pulls the wheel down unevenly. Star pattern every time — no exceptions.
- Wrong seat type on aftermarket wheels. Ball-seat nuts on conical wheels (or vice versa) will back off under vibration, no matter how tight they feel. Always match the seat type to the wheel.
- Skipping the re-torque check. Wheels settle after the first drive. Two minutes with a wrench beats dealing with a loose wheel later.
Frequently Asked Questions
Conclusion
In conclusion, you can’t just tighten the wheels on your Honda Pilot “as tight as possible.” There are recommended torque levels that must be followed.
Here’s the quick-reference summary:
- 2003–2008 (1st Gen): 80 lb-ft (108 Nm) — 19mm socket
- 2009–2026 (2nd, 3rd, 4th Gen): 94 lb-ft (127 Nm) — 22mm socket
- Tighten in a star pattern (1–3–5–2–4), never in a circle
- Dry threads only — no grease, no anti-seize
- Use a thin-wall deep socket so you don’t scratch the wheel pockets
- Re-check the torque after 25–50 miles on any new wheel installation
- Make sure your lug nut seat type matches your wheels (ball vs. conical)
Got a question about your specific model year or wheel setup? Drop it in the comments!

a cat lover, Honda driver, automotive enthusiast, and occasional photographer.
Nurjati is a proud Honda SUV owner and passionate content creator dedicated to sharing expert insights about full-size family SUVs.
His first car in school was a Honda, and she’s been in love with the brand ever since. With over 10 years of experience as a journalist and automotive blogger, Nurjati is committed to keeping enthusiasts and buyers informed and inspired.